How to Replace the Battery in a Solar Street Light?

Time:2026-09-20 Author:Mason
0%

Solar street lights are expanding with the wider renewable-energy market. IRENA reported that global solar capacity reached about 1,419 gigawatts by the end of 2023. Off-grid systems also remain important. The World Bank’s 2022 Off-Grid Solar Market Trends Report estimated that 490 million people used off-grid solar products in 2021.

The battery remains the system’s quiet center. It stores daytime energy, powers the lamp after sunset, and absorbs seasonal stress. Heat, deep discharge, moisture, and poor charging can shorten its service life. Peter Gevorkian, a renewable-energy systems engineer and author of Large-Scale Solar Power Systems, wrote, “A solar energy system is only as reliable as its weakest component.” That principle matters when learning how to replace battery in solar street light systems.

This guide focuses on safe inspection, correct battery matching, and practical replacement steps. It explains how to isolate the circuit, photograph cable positions, check polarity, and protect terminals from corrosion. A replacement battery must match the voltage, chemistry, capacity, connector, and enclosure requirements. Bigger is not always better.

Small details matter.

A swollen battery, cracked case, or burning smell requires professional attention. Do not force the cover. Do not guess the polarity. This is not a perfect checklist, because models differ and field conditions can be messy. Installation records may be missing. Labels may have faded. Careful testing remains essential. By combining manufacturer instructions, maintenance experience, and evidence from industry reports, the process becomes safer, clearer, and more dependable.
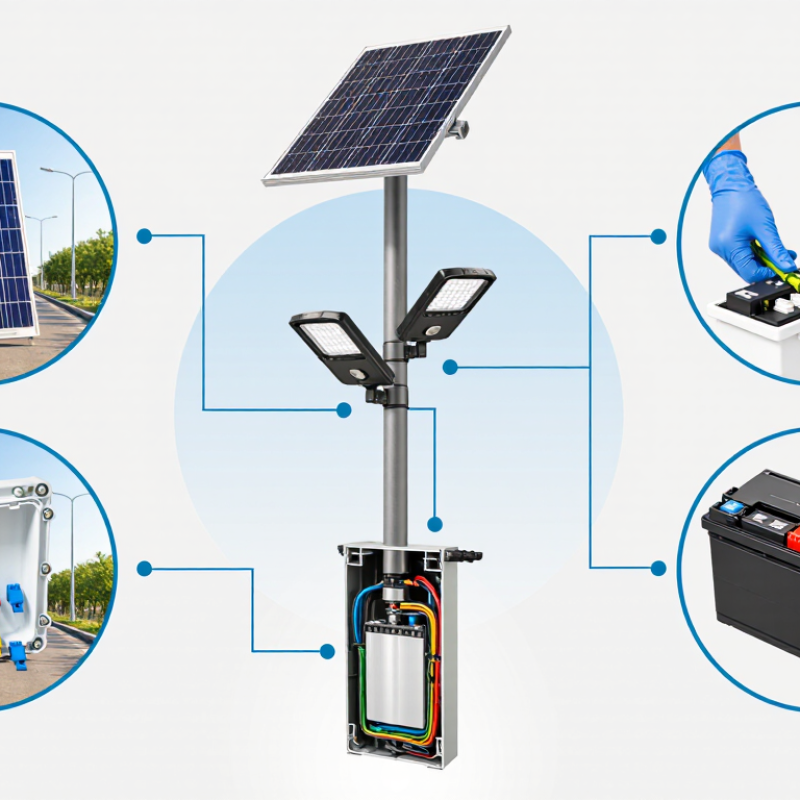
How to Replace the Battery in a Solar Street Light?

Safety Precautions Before Replacing a Solar Street Light Battery

How to Replace the Battery in a Solar Street Light?

Safety Precautions Before Replacing a Solar Street Light Battery

Before opening the housing, inspect the pole, ground, and weather conditions. Never work during rain, strong wind, or nearby lightning. A wet ladder is not a minor detail. Use an approved platform, secure the work area, and keep pedestrians away from falling tools. Wear insulated gloves, eye protection, and footwear with good traction. Turn off the light and isolate the solar panel according to the equipment instructions. Cover the panel if practical, because sunlight can still produce electrical power.

Check the battery label, voltage, chemistry, and physical condition before touching the terminals. A swollen case, leaking fluid, burnt smell, or heavy corrosion requires professional service. Do not puncture or open a damaged battery. Remove metal jewelry, and use insulated tools to reduce accidental short circuits. Disconnect the negative cable only when the system instructions permit it, then disconnect the remaining cables carefully. Photographing the wiring can help, but I still verify polarity with a meter. Memory is unreliable.

Keep the replacement battery upright and away from flames, sparks, and loose metal objects. Ensure ventilation around the enclosure, especially with batteries that may release gas during faults. Never force a connector or reverse the terminals. Secure every cable so vibration cannot loosen it. Before closing the housing, inspect seals, fasteners, and cable insulation. Used batteries need approved collection and recycling channels; placing one in ordinary waste can create serious environmental and fire risks. When uncertain, stop and ask a qualified technician.

How to Identify the Correct Replacement Battery

How to Replace the Battery in a Solar Street Light?

How to Identify the Correct Replacement Battery

The correct battery is not chosen by size alone. Check the original label, service manual, or wiring diagram before ordering anything. Record the battery voltage, chemistry, capacity, terminal style, and physical dimensions. A battery marked 12 volts is not automatically suitable for every 12-volt system.

Chemistry matters. Lithium iron phosphate, lithium-ion, and lead-acid batteries have different charging requirements. Using the wrong type can reduce performance or damage the controller. Check the charging voltage and recommended capacity carefully. I once focused on capacity and overlooked the connector shape. The battery fit, but the cable connection was unsafe. That mistake was avoidable.

Measure the battery compartment with a ruler, including clearance above the terminals. Compare the replacement’s length, width, height, connector polarity, and mounting method. Inspect the old battery for swelling, leakage, corrosion, or cracked insulation. Do not copy unclear markings from memory. Take a clear photograph before disconnecting anything, then switch off the light and isolate the solar input when possible. Outdoor temperatures also matter, especially in freezing or very hot locations. Some specifications are easy to misread. If the label is damaged, ask a qualified technician to verify the system before installation. Recycle the old battery through an approved local collection service, not household waste.

How to Remove the Old Battery Safely

How to Replace the Battery in a Solar Street Light?

How to Remove the Old Battery Safely

Before opening the housing, read the light’s service instructions and identify the battery type. Lithium and lead-acid batteries require different handling procedures. Wear insulated gloves, eye protection, and protective clothing. Work during daylight, but cover the solar panel if practical. Disconnect the panel, controller, and main battery connection in the recommended order.

I used to rush this step. That was a mistake. Turn off the circuit and confirm that the lighting system is isolated with a suitable meter. Do not rely only on the switch. Remove metal jewelry, and use insulated tools to loosen the terminals. Disconnect the negative cable before the positive cable, unless the service manual specifies another sequence. Keep the tool from touching both terminals.

Lift the old battery carefully with both hands. Never pull hard on its wires or case. A swollen, cracked, leaking, or unusually hot battery should not be handled normally. Stop work, keep people away, and contact a qualified technician or approved collection service. Do not place the battery in household waste, burn it, or mix it with other batteries. Put an undamaged battery in a non-conductive container, keeping its terminals protected with suitable tape. Check the compartment for corrosion, moisture, or loose cables before installing the replacement. Take photos before disconnecting; small wiring details are easy to forget.

How to Install and Connect the New Battery

How to Replace the Battery in a Solar Street Light?

How to Install and Connect the New Battery

Turn off the light and cover the solar panel before opening the battery compartment. This prevents unexpected charging current. Wear insulated gloves and check the old battery for swelling, leaks, or corrosion. Photograph the existing cable positions before removal. That small step can prevent confusion later.

Choose a replacement battery with the same voltage, chemistry, and suitable capacity. Disconnect the negative cable first, then the positive cable. Remove the old unit carefully. Place the new battery firmly in its holder, with no movement inside the enclosure. Connect the positive cable first, followed by the negative cable. Match the marked polarity exactly. A reversed connection may damage the controller. Tighten each terminal, but do not force it. I have seen loose terminals cause flickering after only one night. The connection looked correct, yet it was not secure enough.

Tips: Keep cable ends clean and dry. Use insulated tools near the terminals. Check that the gasket sits evenly before closing the compartment. Inspect the cable entry for cracks. After installation, uncover the panel and test the light at night or in a shaded area. Confirm that charging begins during daylight. If the lamp stays off, recheck the fuse, polarity, sensor setting, and connector seating. Do not guess with electrical parts. Recheck the manual and measurements.

How to Replace the Battery in a Solar Street Light?

This chart shows typical open-circuit voltage readings for a 12 V lead-acid battery during replacement. Disconnect the solar panel and load before removing the old battery, connect the new battery with correct polarity, and verify the voltage before closing the enclosure.

How to Test the Light and Maintain the New Battery

After replacing the battery in a solar street light, test the wiring before closing the housing. Switch off the light and check that the terminals are tight. Confirm the positive and negative cables match the marked positions. A reversed connection can damage the controller. I once overlooked a loose terminal, and the lamp worked only intermittently. It still happens.

Use a multimeter to measure the battery voltage in daylight. The reading should match the battery’s rated voltage within a reasonable range. Cover the solar panel with a thick cloth, then wait for the lamp to activate. The light should turn on steadily without flickering. Remove the cloth and confirm that charging resumes. Test the lamp again after several hours of sunlight. This reveals weak charging that a quick evening test may miss.

Keep the battery area dry, clean, and free from insects or loose debris. Inspect the terminals every few months for corrosion, swelling, heat marks, or damaged insulation. Wipe the solar panel with a soft, damp cloth because dust reduces charging efficiency. Do not scrape the panel with metal tools. Record the test date and voltage readings. This simple log helps identify gradual capacity loss. If the battery becomes unusually hot or swollen, stop using the light and arrange professional replacement. Some readings may look acceptable, yet the battery can still fail under nighttime load. Testing only once is not enough.

How to Replace the Battery in a Solar Street Light? - How to Test the Light and Maintain the New Battery

Phase Task Recommended Method or Specification Expected Result Safety and Maintenance Notes
1. Preparation Confirm battery compatibility Match the original system voltage, battery chemistry, physical dimensions, terminal arrangement, and capacity. Use the same chemistry unless the charge controller is specifically compatible with the replacement chemistry. The replacement battery fits securely and is suitable for the existing charging system. Do not mix lead-acid and lithium batteries in a system designed for only one chemistry. Check the light manufacturer's electrical specifications.
1. Preparation Gather tools and protective equipment Prepare insulated tools, gloves, eye protection, a digital multimeter, cleaning cloth, corrosion-resistant terminal protection, and replacement fasteners if required. The work area is ready before the enclosure is opened. Work during daylight and dry weather. Remove metal jewelry and keep conductive objects away from the terminals.
2. Isolation Switch off and isolate the light Turn off the system switch if provided. Cover the solar panel with an opaque material or disconnect the panel according to the service instructions, then disconnect the load before removing the battery. The light cannot start unexpectedly and charging current is removed. Follow the controller's specified disconnect sequence. Avoid shorting the battery terminals.
3. Removal Open and inspect the battery compartment Remove the cover carefully and photograph or label the positive and negative cable positions before disconnection. Check for water ingress, heat damage, loose hardware, or corrosion. The wiring layout is documented and any underlying fault is identified. If the enclosure is wet, swollen, cracked, or burnt, stop work and have the system inspected by a qualified technician.
3. Removal Disconnect and remove the old battery Disconnect the negative cable first, followed by the positive cable. Remove the retaining bracket and lift the battery without tilting it unnecessarily. The old battery is removed without damaging the cables or enclosure. For lead-acid batteries, prevent contact with electrolyte and dispose of the battery through an approved recycling channel.
4. Installation Clean and inspect the connections Remove light corrosion with an appropriate terminal brush. Tighten damaged or loose cable lugs only after confirming that cables are not frayed or overheated. Terminals are clean, dry, secure, and electrically sound. Do not apply grease between electrical contact surfaces. Use terminal protectant only after the connection is secure.
4. Installation Install and secure the new battery Place the battery in the correct orientation, reconnect the positive cable first and the negative cable second, and tighten terminals to the battery manufacturer's recommended torque. The battery is firmly held in place with correct polarity and no cable strain. Reverse polarity can damage the controller. Do not overtighten terminals or use makeshift spacers.
5. Initial Test Measure battery voltage before charging Set the multimeter to DC voltage and measure directly across the terminals. Compare the reading with the battery's rated voltage and installation documentation. The reading is consistent with the battery chemistry and rated system voltage; a near-zero or unusually high reading requires investigation. Voltage alone does not prove battery capacity or health. Use the correct test procedure for the battery chemistry.
5. Initial Test Verify solar charging Expose the solar panel to sunlight and check the controller's charging indicator or measure charging current using the manufacturer's approved method. The controller recognizes the battery and charging begins under suitable sunlight. Charging current changes with sunlight, panel temperature, battery state of charge, and controller limits.
5. Initial Test Test the light at night Cover the solar panel completely or wait until darkness. Confirm that the lamp turns on, reaches normal brightness, and responds to the controller's programmed operating mode. The lamp starts automatically and remains illuminated without flickering or unexpected shutdown. Allow for motion sensors, dimming schedules, low-battery protection, and programmed time limits when evaluating operation.
6. Performance Check Check overnight performance Record start time, operating mode, weather conditions, and shut-off time for at least one normal night. Compare the result with the system's design operating period. The light operates for the expected period under comparable weather and load conditions. One cloudy day may reduce runtime. Repeated short runtime can indicate insufficient charging, excessive load, wiring loss, or a faulty controller.
7. Routine Maintenance Clean the solar panel and inspect the enclosure Clean dust, leaves, and bird deposits with water and a soft cloth. Inspect seals, cable glands, mounting hardware, and drainage openings. The panel receives unobstructed sunlight and the battery compartment remains dry and secure. Inspect at least every 3–6 months, and more often in dusty, coastal, snowy, or high-humidity locations.
7. Routine Maintenance Monitor battery condition Check for swelling, cracks, leakage, corrosion, unusual odor, excessive heat, or a gradual reduction in nighttime runtime. Record inspection dates and voltage readings. Changes in performance are detected before they cause a complete lighting failure. Replace a battery that is damaged, leaking, swollen, or unable to maintain the required runtime. Never open sealed batteries.
8. Finalization Close the compartment and document the service Reinstall the cover, tighten fasteners evenly, confirm that seals are seated, and record the battery type, rated capacity, installation date, test results, and observed runtime. The enclosure is protected from weather and future maintenance is traceable. Do not operate the light with a loose cover, exposed terminals, damaged cables, or compromised waterproofing.

FAQS

What should I check before removing a solar street light battery?

Read the service instructions and identify the battery chemistry. Lithium and lead-acid batteries need different handling. Work in daylight. Cover the solar panel when practical.

Which protective equipment is needed?

Wear insulated gloves, eye protection, and protective clothing. Remove metal jewelry before touching terminals. Use insulated tools near the battery.

How can I confirm the circuit is safely isolated?

Turn off the circuit and use a suitable meter. Do not trust the switch alone. Disconnect the panel, controller, and battery as instructed.

Which battery cable should be disconnected first?

Disconnect the negative cable before the positive cable, unless the manual specifies another sequence. Keep tools away from both terminals. A small mistake can create a dangerous short.

What should I do with a swollen or leaking battery?

Stop working immediately. Keep people away from the area. Contact a qualified technician or approved collection service. Do not burn it or place it in household waste.

How should an undamaged old battery be stored temporarily?

Place it in a non-conductive container. Protect its terminals with suitable tape. Keep it separate from other batteries and away from moisture.

How do I choose a suitable replacement battery?

Match the original voltage, chemistry, and suitable capacity. Photograph the cable positions before removal. This simple record can prevent wiring confusion later.

How should I connect the replacement battery?

Place it firmly in the holder, with no movement. Connect positive first, then negative. Match the marked polarity exactly. Tighten terminals without forcing them. I once underestimated loose terminals. The light flickered after one night.

What should I inspect before closing the battery compartment?

Check for corrosion, moisture, loose cables, and damaged cable entries. Ensure the gasket sits evenly. Keep cable ends clean and dry.

How can I test the light after replacement?

Uncover the solar panel and test the light at night or in shade. Confirm charging begins during daylight. If it stays off, check the fuse, polarity, sensor, and connectors. Do not guess. Recheck the manual and measurements.

Conclusion

Replacing a solar street light battery requires careful preparation and attention to safety. Before starting, switch off the light, isolate the power connection, and choose a dry, stable working area. Wear suitable protective equipment and inspect the unit for damaged wires or corrosion. To determine the correct replacement, check the battery’s voltage, capacity, size, chemistry, and terminal arrangement, ensuring they match the light’s specifications. After opening the battery compartment, photograph or label the existing connections, then disconnect the old battery carefully without pulling on the wires.

To learn how to replace battery in solar street light, install the new battery in the same position and connect the terminals with the correct polarity. Secure it firmly so it will not move or vibrate, then close the compartment to protect it from moisture and dust. Test the light by covering the solar panel or waiting until nighttime, and confirm that charging and illumination work normally. Regularly inspect the battery, connections, and compartment, and keep the solar panel clean to support reliable performance.

Mason

Mason

Mason is a seasoned marketing professional with a deep expertise in the company's offerings and a passion for driving brand awareness. With a strong background in digital marketing strategies, he has an innate ability to connect with diverse audiences and effectively communicate product benefits.......